线程安全策略
不可变对象
不可变对象需要满足的条件
1.对象创建以后其状态就不能修改
2.对象所有域都是final类型
3.对象是正确创建的(在对象创建期间,this引用没有逸出)
final 关键字:类,方法,变量
修饰类:不能被继承
修饰方法:1.锁定方法不被继承类修改;2.提升运行效率(针对于早期版本jdk)
修饰变量:修饰数据类型变量(一旦初始化便不能修改),引用类型变量(初始化之后不能再指向另外一个对象)
声明不可变对象相关的集合类
Collections.unmodifiableXXX:Collection,List,Set…
Guava:ImmutableXXX:Collection,List,Set…
线程封闭
线程封闭的几种实现方式
Ad-hoc 线程封闭:程序控制实现,最糟糕的方式,忽略
堆栈封闭:简单来说就是局部变量,无并发问题
ThreadLocal 线程封闭:特别好的封闭方法
常见的线程不安全类与写法
StringBuilder -> StringBuffer
SimpleDateForamt -> Joda-Time
ArrayList,HashSet,HashMap 等 Collections
先检查在执行:if(condition(a)){handle(a);}触发线程不安全
同步容器,并不能完全的确保线程安全
ArrayList -> Vector,Stack
HashMap -> HashTable(key value 不能为 null)
Collections.synchronizedXXX(List,Set,Map)
并发容器 J.U.C
ArrayList ->CopyOnWriteArrayList
HashSet,TreeSet -> CopyOnWriteArraySet,ConcurrentSkipListSet (只能保证单一操作原子性,如 add,remove 是线程安全的,不能保证批量操作如 containAll 等的原子性,即批量操作是线程不安全的)
HashMap,TreeMap -> ConcureentHashMap,ConcurrentSkipListMap
AbstractQueuedSynchronizer - AQS
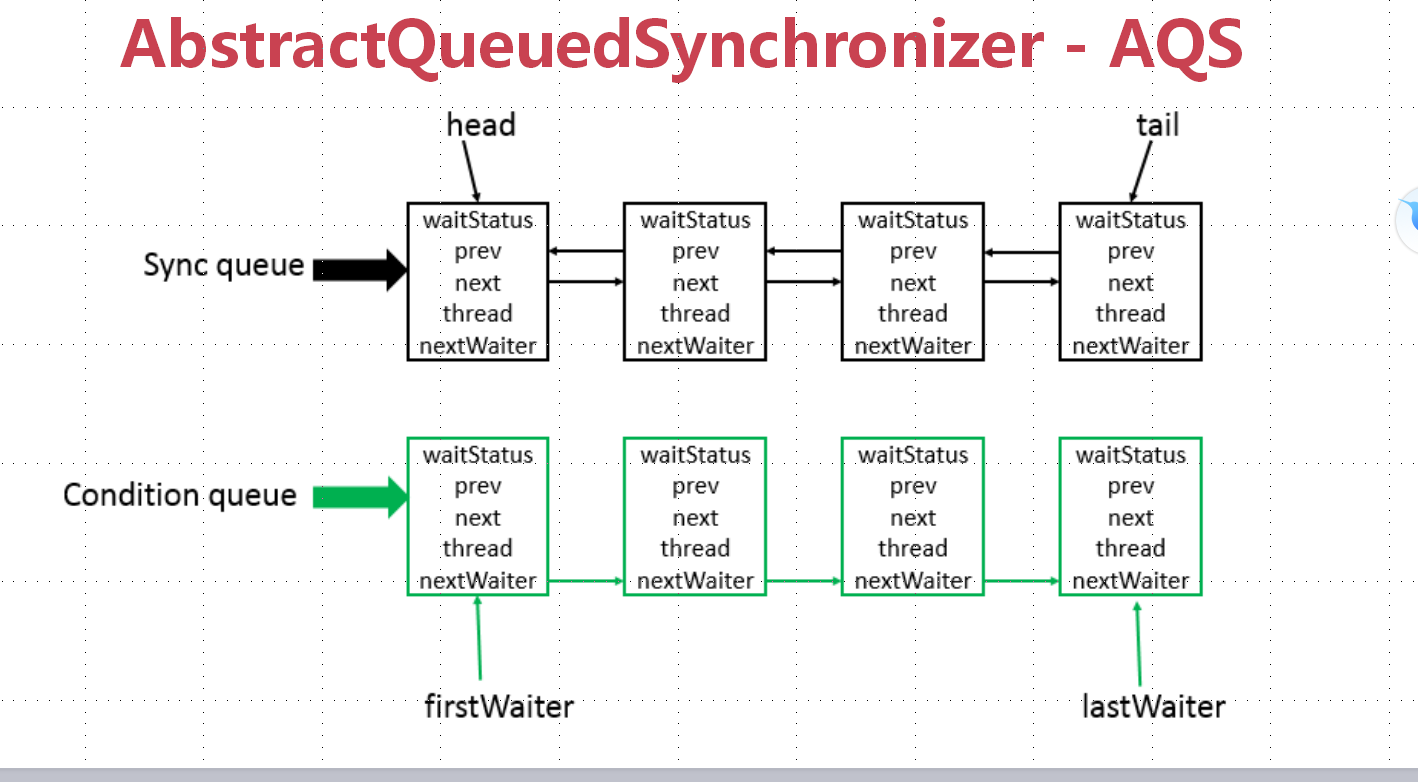
使用 Node 实现 FIFO 队列,可以用于构建锁或者其他同步装置的基础框架
利用了一个 int 类型表示状态
使用方法是继承,子类通过继承并通过实现它 的方法管理其状态{acquire 和 release}的方法是操纵状态
可以同时实现排它锁和共享锁模式(独占,共享)
AQS 同步组件
CountDownLatch (通过计数来表示线程是否需要一直阻塞)
Semaphore (控制同一时间线程并发的数目)
CycliBarrier
ReentrantLock
Condition
FutureTask
…
CountDownLatch
通过计数来表示线程是否需要一直阻塞
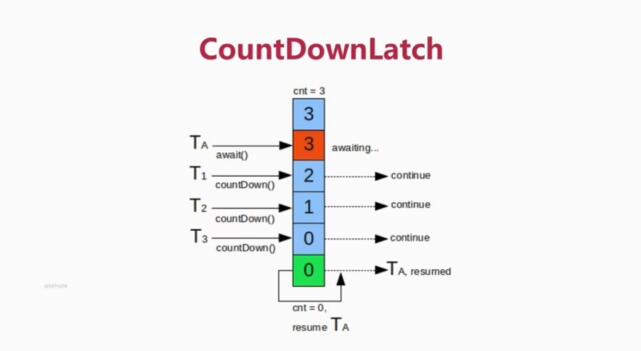
1 | private final static int threadCount = 200; |
Semaphore
控制同一时间线程并发的数目
1 | private final static int threadCount = 20; |
CycliBarrier
和CountDownLatch一样使用计数器实现
区别:
  1.可以通过reset()重置计数器循环使用.CountDownLatch的计数器只能使用一次.
  2.CountDownLatch主要是实现一个或n个线程需要等到其他线程完成操作后才能继续执行,标示的是一个或n个线程等待其他线程的关系;而CycliBarrier主要是实现了多个线程
  之间的相互等待,直到所有的线程都满足了某个屏障点后再进行后续的操作,标示的是各个线程之间相互等待的关系.
1 | private static CyclicBarrier barrier = new CyclicBarrier(5); |
ReentrantLock 与锁
java 中有两类锁,一类是 synchronized 关键字,一类就是 juc 中的锁
ReentrantLock(可重入锁)和synchronized区别
1.可重入性
2.锁的实现.synchronized依赖JVM,而ReentrantLock是jdk实现的
3.性能的区别,synchronized未优化前,性能差很多.但是从synchronized引入偏向锁(轻量级锁也就是自旋锁)后,两者的性能差不多.
4.功能区别,synchronized使用方便,不需要手动释放锁,JVM会自动释放,不会造成死锁.而ReentrantLock需要手工加锁和释放锁,不释放会造成死锁;
灵活度上ReentrantLock优越于synchronized

ReentrantLock独有的功能:
1.可指定是公平锁(先等待的线程先获得锁)还是非公平锁
2.提供了Condition类,可以分组唤醒需要唤醒的线程
3.提供能够中断等待锁的线程的机制,调用lock.lockInterruptibly()来实现
1 | // 请求总数 |
1 | // ReentrantReadWriteLock读锁和写锁 (读锁很多,写锁很少的时候,会造成写锁一直等待,获取不到造成写锁饥饿) |
1 | // StampdLock |
1 | // StampdLock 乐观锁和悲观锁 |
使用总结:
1.当只有少量线程竞争的时候,推荐使用 synchronized 锁实现
2.线程竞争量不少,但是线程增长量是在能预估的情况下,使用 ReentrantLock 实现
Condition
1 | public static void main(String[] args) { |
FutureTask
Callable 与 Runable 接口对比:
相同点:
两者都是接口;
两者都可用来编写多线程程序;
两者都需要调用Thread.start()启动线程;

不同点:
两者最大的不同点是:实现Callable接口的任务线程能返回执行结果;而实现Runnable接口的任务线程不能返回结果;
Callable接口的call()方法允许抛出异常;而Runnable接口的run()方法的异常只能在内部消化,不能继续上抛;
Future 接口:
Callable接口支持返回执行结果,此时需要调用FutureTask.get()方法实现,此方法会阻塞主线程直到获取到结果;当不调用此方法时,主线程不会阻塞!
1 | static class MyCallable implements Callable<String> { |
1 | public static void main(String[] args) throws Exception { |
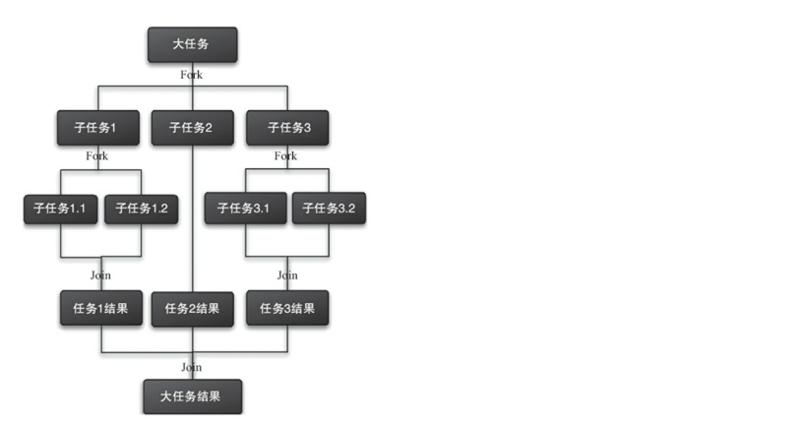
Fork/Join 框架
java7 提供的一个并行执行任务的框架,把大任务分割成 N 个小任务,最后将小任务结果合并
1 | 4j |
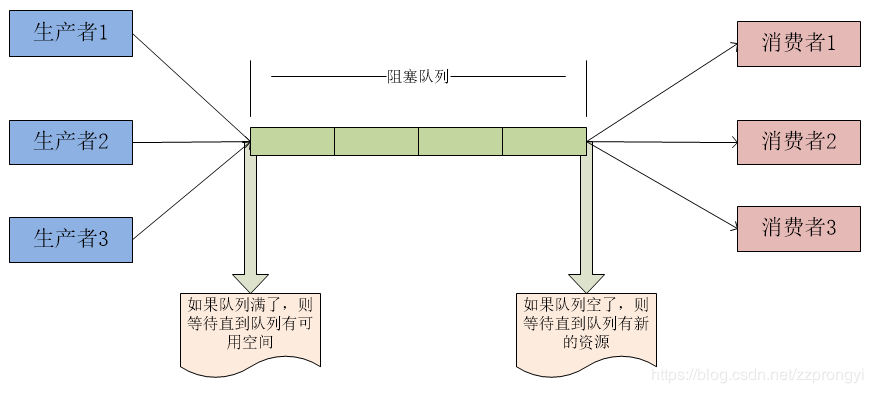
BolckingQueue
BlockingQueue 是阻塞队列,利用 ReentrantLock 的接口实现 ,依据它的基本原理,我们可以实现经典的生产者与消费者模式
相关实现类:
ArrayBlockingQueue: 有界(容量是有限的)阻塞队列,内部实现是数组.初始化指定容量大小,先进先出的方式存储数据.最先插入的是尾部,最先移除的是头部.
DelayQueue:提供了在指定时间才能获取队列元素的功能,队列头元素是最接近过期的元素。没有过期元素的话,使用 poll()方法会返回 null 值,超时判定是通过 getDelay(TimeUnit.NANOSECONDS)方法的返回值小于等于 0 来判断。延时队列不能存放空元素。延时队列实现了 Iterator 接口,但 iterator()遍历顺序不保证是元素的实际存放顺序。其队列元素需要实现 Delayed 接口
LinkedBlockingQueue:大小配置是可选的,初始化指定大小则是有边界的,如果不指定则是无边界(容量使用的是 Integer.MAX_VALUE).内部实现是一个链表.先进先出的方式存储数据.最先插入的是尾部,最先移除的是头部.
PriorityBlockingQueue:带有优先级的队列,是一个无边界的队列.允许插入 null.通过构造函数传入的对象来判断,传入的对象必须实现 comparable 接口。对象排序的规则就是在 comparable 中的规则.
SynchronousQueue:又称为同步队列,无界非缓存队列.内部只能包含一个元素的队列。插入元素到队列的线程被阻塞,直到另一个线程从队列中获取了队列中存储的元素。同样,如果线程尝试获取元素并且当前不存在任何元素,则该线程将被阻塞,直到线程将元素插入队列。